

Bill Pay Frequently Asked Questions
When will funds be taken from my account?
The timing of the withdrawal depends on how the payment is processed:
- Electronic Payments: Funds are debited from your account on the Send On date selected when scheduling the payment. If sufficient funds are not available, the payment will not be processed and must be rescheduled once funds are available.
- Check Payments: On the business day following the selected Send On date, the payment amount is placed on hold in the funding account until the check is presented for payment.
How do I add a company or person to pay?
Before making a payment, you must add the company, person, or account you want to pay (called a biller).
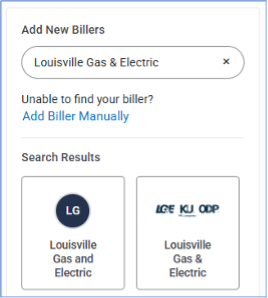
- After accessing Bill Pay, enter the company name in the Add New Billers search box.
- Select the biller from the search results.
- If no results are returned, try an alternate name (for example, search Louisville Gas & Electric instead of LG&E).
- If the biller is unavailable electronically, select Add Biller Manually.
- On the Find/Add Biller page, enter the required account information (without spaces or dashes) and select Add Biller.
How do I schedule a payment?
Conveniently use the Pay Bills tab to pay existing billers.
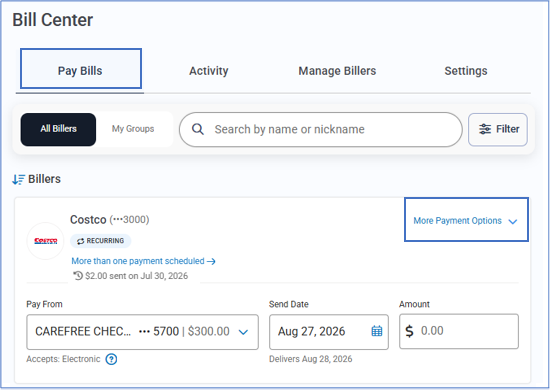
- For a one-time payment, select the Pay From account, Send Date (allow enough time for delivery before the due date), and enter the Amount.
-
- Select Pay Now or Add This Payment to pay multiple bills at once.
- Review the payment details and select Pay Total.
- When the confirmation screen appears, your payment is complete.
- Select More Payment Options to schedule recurring payments or access additional payment features.
- Note: Recurring payments should be reviewed regularly to make sure the amount, date, and funding account are still correct.
How do I review my activity?
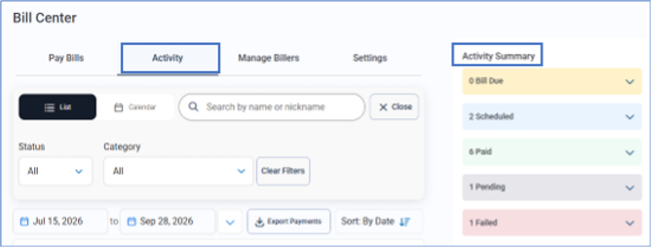
The Activity Summary provides a convenient view of bill payment activity, including the past 30 days and upcoming 45 days, and is available on multiple Bill Pay pages.
From the Activity tab, you can use filters, date ranges, and search options to review up to 18 months of payment activity.
To view activity for a specific biller:
- Locate the biller using the search or filter options.
- Select the > next to the payment amount to open Payment Activity.
- Select View Payment Details or Edit Payment to delete a payment, edit a single payment, or modify a recurring payment series.
How do I update biller information?
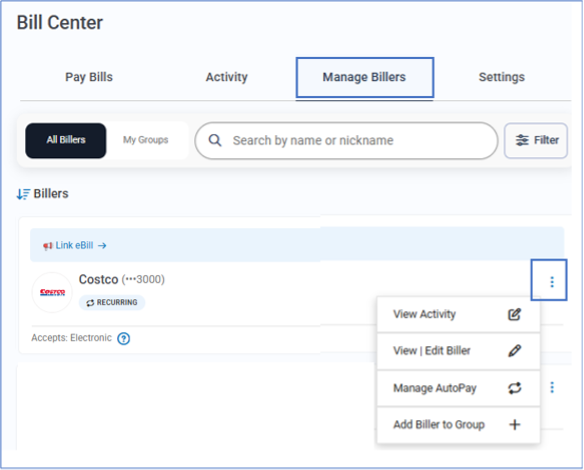
To update or review a biller's information, go to the Manage Billers tab and locate the biller using the search feature if needed. Select the three dots (⋮) next to the biller’s name to access additional options:
- View Activity – Review biller payment activity for the past 18 months and upcoming 12 months.
- View/Edit Biller – Update details such as the account number or address.
- Manage AutoPay – Set up or modify automatic payments.
- Add Biller to Group – Add the biller to an existing group or organize billers into a new group.
How do I hide billers I no longer pay?
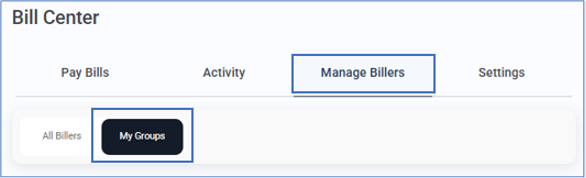
My Groups lets you organize billers into custom groups, such as Active Billers, Monthly Bills, or Annual Payments. Creating an Active Billers group helps display only selected payees on Pay Bills tab.
- Go to the Manage Billers tab and select My Groups.
- Select Create New Group.
- Check the box for billers you’d like to group together.
- Select Add Selected and Continue.
- Enter a group name, such as Active Billers.
- Select Save Group.
- To make this your default view, set Default Group to Yes and select Done.
Note: Setting an Active Billers group as your default view reduces clutter and makes it easier to find the billers you pay most often from the Pay Bills tab. Once a group is created, you can toggle on the Pay Bills tab between All Billers or My Groups.
How do I enroll in eBills?
To enroll in eBills for an eligible biller:
- Go to the Manage Billers tab.
- Locate the biller you want to enroll.
- Above the biller’s name, select Link eBill.
- Enter any required information and follow the prompts to complete enrollment.
Once enrolled, participating billers can send electronic bill information directly to Bill Pay, allowing you to view and pay bills from one convenient location.
How do I manage my Bill Pay alerts and notifications?
Bill Pay notifications help keep you informed about important bills and payment activity.
- From Bill Pay, select the Settings tab.
- Under Notifications, select Manage how you get notifications
- Check the box for email, text message, or both notification methods.
- Select Save Changes.
Note: Your contact email and phone number are managed through the Online Banking My Settings page and cannot be updated directly in Bill Pay.
Where can I view copies of cleared Bill Pay checks?
Images of cleared Bill Pay checks are available in the transaction history of the funding account, just like checks written directly from your account.
- Navigate to the account used to fund the Bill Pay payment.
- Locate the cleared check transaction in the account history.
Note: Check images are only available after the check has cleared and been processed.